Rubber Stamping Techniques
Are you new to stamping?
Master these basic rubber stamping techniques, then get creative and explore the many ways you can use stamping in your paper crafts.
 |
 |
Types of Stamps
There are different types of stamps that can be used in paper crafting. The more traditional stamp is the rubber stamp bought already mounted on a wooden block.
These stamps are still available to buy, however most stamps are now sold as a sheet of rubber or clear acrylic. Some of these stamps need to be cut out of the sheet and others are already cut and ready to use. These stamps need to be mounted onto a clear acrylic block to use them. Many of them cling to your stamping block but with some you have to use re-positionable adhesive to fix them to your block.
Digital stamps are gaining in popularity. They have many advantages over physical stamps - they don't need storage space and you can buy and download your stamp immediately. You can find free digital stamps on many websites, so you can try out digital stamping for free before finding and buying the perfect images to use in your paper crafting.
Rubber Stamping Techniques
 |
The basic technique is to place your stamp onto an acrylic block, unless you are using a stamp mounted on wood. Apply ink to to the stamp using an ink pad. Then, on a flat hard surface press your stamp down firmly and evenly onto your paper or card. |
Clean your stamp after use - you can buy propriety cleaners - I spritz mine with water and then wipe them clean with a paper towel.
You can use your stamped image in many ways.
Coloring Your Image
You can use many different mediums to colour your stamped images. A popular coloring method is to use alcohol based markers.
I use ProMarkers and there are other brands available eg. Spectrum Noir and Copic markers. These markers give a smooth coverage and blend easily. They work best on a bright white, smooth heavy paper or card stock. They will 'bleed' on some surfaces and can soak through thin papers to the surface beneath.
You can also color your images with any artist materials you may already have eg. pencils, paints and pastels. Remember to use a fixative if you are using pastels that smudge.
|
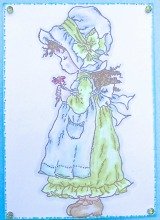
You can use water color pencils. Here I am using a white tile to blend colors on and I lift the color from the pencil with a wet paint brush. |
 |
|
The image on the left has been colored with watercolor pencils and the one on the right has been colored with Promarkers. |
 |
Creating 3D Decoupage with your Stamped Images
Stamp your chosen image a number of times - usually 3 - 5 times.
Work out which parts of your image you would like to decoupage and how many layers you would like.
|
Then color your background image and the areas on the other images that you are going to cut out and decoupage. |
 |
You can find 3D decoupage instructions here.
 |
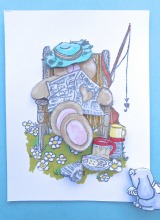
Another rubber stamping technique to try is stamping and embossing. I stamped this steampunk image with a Ranger Distress ink pad, covered the image with gold embossing powder and melted the powder with a heat tool. |
Rubber Stamping Techniques > Techniques > The PaperCraft Room